Clean up duplicate identities and users from Workspace ONE using REST API's and PowerShell
Workspace ONE gives us a centralized management plane for our users digital workspace. But with the proliferation of identity and access management solutions, it isn't uncommon to find users with multiple identities in our management plane. Especially when you lift and shift from one identity solution to the next.
I have a friend and colleague who is working with a beverage company who have a fairly tedious task ahead of them. They have to clean up duplicate identities, and do it quickly. I thought it would be great to share a solution I put together, and discuss how you can go about cleaning up identities in your environment as well.
But before we get to the good stuff; some mood lifting visual stimuli...
 |
| Entrance to Andaz Maui at Wailea Fun fact: Novell eDirectory still exists. Owned and maintained by NetIQ. Any readers still using eDirectory, send me a email so I can buy you a beer. |
A lot of organizations start with Workspace ONE by importing identities using LDAP integration with Workspace ONE. This is pretty simple as it uses a BIND account to talk to a single directory over port 636 or 3269 (securely), or unsecured over port 389 or 3268. But eventually organizations find themselves having to integrate with multiple directories, and this is where the duplicate or stale identity record problem becomes an issue.
This becomes more common when you begin to use SCIM to provision users in VMware Access (formerly VMware Identity Manager), and then integrate users from VMware Access in to Workspace ONE.
To give a clearer example of this; Instead of users starting off in Active Directory, and then imported in to Workspace ONE; users could start off in Okta's Universal Directory. From Okta the user is provisioned in Access using SCIM, and then from Access the user is imported in to Workspace ONE. But if the user was already created prior to the Okta integration, you find your Workspace ONE environment with duplicate identities.
SCIM is an increasingly popular standard. For context on the acronym; it stands for System for Cross-Domain Identity Management. You can read all about SCIM in RFC7642, as well as RFC7643 and RFC7644. I guarantee you that an in depth discussion on SCIM will make you a star at the Thanksgiving dinner table.
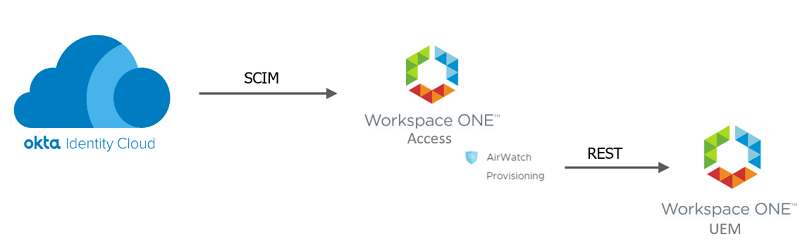 |
| Source: VMware |
Every account in Workspace ONE has a unique identity. This unique identity is a numeric value. To remove these identities; we will store all the numeric values in a flat csv file. PowerShell will pull the contents of the CSV file into an object, and then iterate through each item in the collection stored in the object. When iterating through each item, a PowerShell invoke-restmethod command will be called to delete the identity from Workspace ONE. You don't need to use a csv file. You could store all the unique identifiers in a object in PowerShell, and then reference that object as well.
In previous blog posts, I have shared how I like to use ini/json files to store environment secrets like API keys or environment URLS. I will continue to use this method in this example, and link to the config.ini example that you can use. For the sake over-communicating, I will share a screenshot of what the config.ini file looks like in this example
 |
| Don't forget to update the API key. |
For demonstration purposes, I have (2) users; HawaiiAir and HawaiiBank created. If you hover over the users in the UI of the console, you can see the unique ID for the user. As witnessed in the screenshot below, HawaiiAir has a unique ID of 29.

We gather the list of users we want to delete and have them stored in a csv file. To get these unique identifiers required, you could use Workspace ONE API's to send an HTTP GET Request to the API endpoint at;
/users/search
This API Endpoint lets you filter in your search and filter your results with the following parameters;
/users/search
This API Endpoint lets you filter in your search and filter your results with the following parameters;

If you needed more options to filter your result set on, when your HTTP Response is returned from the API above, you can pipe the object in PowerShell to where-object filter what you've piped in to it. This will trim the results down further. Quick example of how to filter for users containing the phrase Molokai in their email address;
$UserDelete.Users | Where-Object { $_.Email -like "*molokai*"}
A complete list of attributes returned from the API endpoint to search for users is included below for your reference. You may find CustomAttribute value's to be particularly useful to filter on, as you may have attributes such as job code, division, or identity provider source mapped to a CustomAttribute.

Once you have filtered your users, you need to export them in a CSV file for this example. You can pipe your filtered results in to the Export-Csv cmdlet to accomplish this.
$UserDelete.Users | Where-Object { $_.Email -like "*molokai*"} | Export-Csv -Path c:\HawaiiFinancialRetirement\users.csv
You've got your list of users in a CSV file. You are ready to run the code!
 |
| List of users we will delete. User ID 29 and 30. |
Go ahead and run the script in Visual Studio Code, PowerShell ISE, or a PowerShell window. I have added a bunch of comments to the code to try and help you understand what is being done at each step.

After executing lines 1-26, if you want to spot-check the users to be deleted, type $user and a list of user identifiers will be returned. You can only do this if you have added a breakpoint or are debugging the script and able to pause the scripts execution in the IDE. I went ahead and put a breakpoint at line 38 before the API is called so that I can verify the users to be deleted. This also lets me spot-check the body that will be included in the HTTP Request.
 |
| HawaiiAir (29) and HawaiiBank (30) |
After this, the fun starts. The script will iterate through each unique identifier in the $user object, with line 44 running the PowerShell command invoke-restmethod. Invoke-restmethod uses the HTTP header setup in lines 29-42, the body in lines 29-37, and sends our HTTP Request to the API.
One of the tricky parts about working with this API Endpoint is getting the syntax formatting correct for the HTTP message body. The API Explorer documentation shows you the correct formatting, in case you want to write this in another language like Javascript or Python.

After the code iterates through each item in $user, you can return back to your Workspace ONE console and see the identities have been deleted.
 |
| Saving you hours of monotonous work. |
Any questions, feel free to email me at rpringnitz@gmail.com
Mahalo!
Ryan Pringnitz


Comments
Post a Comment